Create a slide visualizing a four-step project workflow: Create Project, Add Sources, Configure Rules, and Review & Publish. Emphasize micro-interactions and callouts at each step. For instance, 'Create Project' should suggest a clear, short name. 'Add Sources' shows a sample dataset in its empty state. 'Configure Rules' has inline validation. 'Review & Publish' blocks publishing if there are critical errors. After these steps, introduce a branching choice for setup: Manual or Import config. Manual setup should be described as guided with defaults, good for small teams, and offer a tip to pre-fill from the last project. Import config allows JSON/YAML upload with a dry-run and checksum check. The overall flow should convey a smooth, efficient process from project creation to publishing, with options for different team sizes and technical levels.
First, introduce the goal: show the core value-creation flow from zero to published.
Then reveal Step 1: Create Project. Emphasize the micro callout: use a short, clear name to anchor context.
Next, bring in Step 2: Add Sources. Point out the empty state with a sample dataset to remove the fear of a blank screen.
Move to Step 3: Configure Rules. Highlight inline validation preventing invalid saves, reducing rework.
Reveal Step 4: Review & Publish. Stress that critical errors block publishing to protect quality.
Finally, show the branch decision. Explain Manual setup is guided and fast for small projects, while Import config supports power users with a safe dry-run and checksum to prevent accidental overwrites.
Close by tying the branch back to Step 2: either path feeds into the same publish-ready review, keeping the flow cohesive.
Behind the Scenes
How AI generated this slide
Analyze user request for a four-step workflow visualization with branching paths.
Select a linear layout to represent the sequential steps, followed by a split for branching choices.
Incorporate motion effects for a dynamic presentation using Framer Motion.
Implement micro-interactions like callouts for additional context at each step.
Use Fragments to control animation staging, ensuring a guided visual flow.
Develop reusable components like 'Step' and 'BranchCard' for consistency and maintainability.
Style components with Tailwind CSS for a polished look.
Ensure responsiveness and accessibility considerations in the layout.
Why this slide works
This slide effectively communicates a complex workflow through clear visuals and micro-interactions. The use of icons, animations, and callouts enhances engagement and understanding. The branching paths are presented clearly, offering choices for different user needs. The code is well-structured with reusable components, making it maintainable and scalable. The design is modern and clean, utilizing Tailwind CSS for efficient styling. Overall, it's a well-executed visualization of a project workflow, balancing aesthetics and functionality.
Slide Code
You need to be logged in to view the slide code.
Frequently Asked Questions
How does the animation enhance the presentation?
The animation, powered by Framer Motion, guides the viewer's attention through the workflow steps. Each element appears sequentially, highlighting the progression from project creation to publishing. This dynamic presentation is more engaging and easier to follow than a static image.
What is the purpose of the micro-interactions?
The micro-interactions, such as the callouts at each step, provide additional context and guidance. They offer helpful tips and highlight key features, enhancing the viewer's understanding of each stage in the workflow. For example, the callout for 'Configure Rules' mentions inline validation, a crucial detail that might be missed otherwise.
How do the branching paths cater to different users?
The branching paths, 'Manual Setup' and 'Import Config,' accommodate different user needs and technical levels. The manual setup is ideal for smaller teams or simpler projects, providing guided steps and default settings. The import config option caters to more advanced users or larger projects, enabling them to upload pre-existing configurations, with safeguards like a dry-run and checksum verification.
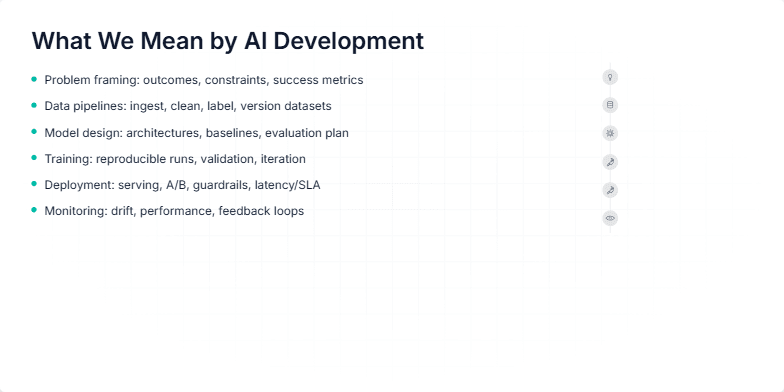
Create a slide that visually represents the full lifecycle of AI development, going beyond just model training. It should emphasize the interconnectedness of each stage, from initial problem framing to ongoing monitoring. Use icons to visually represent each stage. The target audience is technical professionals and product managers involved in AI projects.
Create a slide for a presentation about AI development. The slide should have a futuristic, high-energy feel. It should include a title, a subtle background element, and my name and the date. The title should be 'AI Development'. My name is Alex Delaney, and the date is September 2025. Consider using neon gradients, isometric grids, or other visual elements to enhance the design. I want the overall aesthetic to be modern and engaging, suitable for a tech-focused audience.
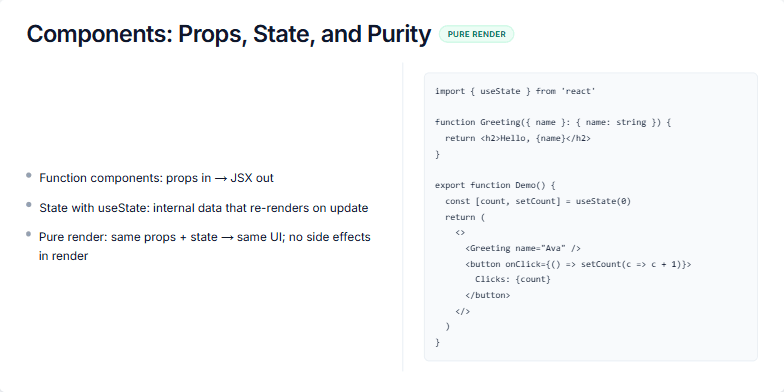
Create a slide about React components, focusing on props, state, and the concept of pure render. The slide should explain how function components work with props as input and JSX as output. It should also differentiate between props and state, highlighting that props are external and immutable while state is internal and can trigger re-renders when updated. Emphasize the importance of pure render, where the same props and state always produce the same UI, avoiding side effects during render. Include a code example demonstrating a simple component with props, state, and a button that updates the state. Visually, the slide should have a title, a short description of pure render, a list of key concepts (props in, JSX out; state updates trigger re-renders; pure render = same input, same output), and the code example. Use animations to make the content appear dynamically. The speaker notes should reinforce these concepts and provide a detailed explanation of the code example.
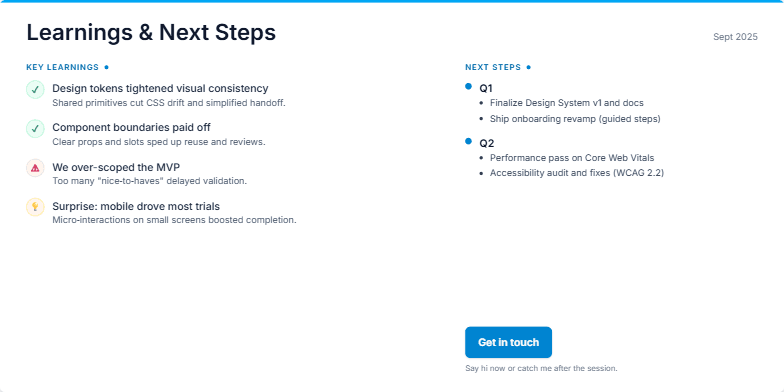
This slide summarizes key learnings and next steps after a project iteration. It's designed for a presentation to stakeholders or a team, aiming to transparently share successes, challenges, and the future roadmap. The slide visually separates learnings and next steps into two columns. Learnings are categorized with icons representing positive, negative, and unexpected outcomes. Next steps are outlined per quarter, highlighting key goals like design system finalization, onboarding revamp, performance enhancement, and accessibility improvements. Finally, a call to action encourages the audience to connect for further discussion.
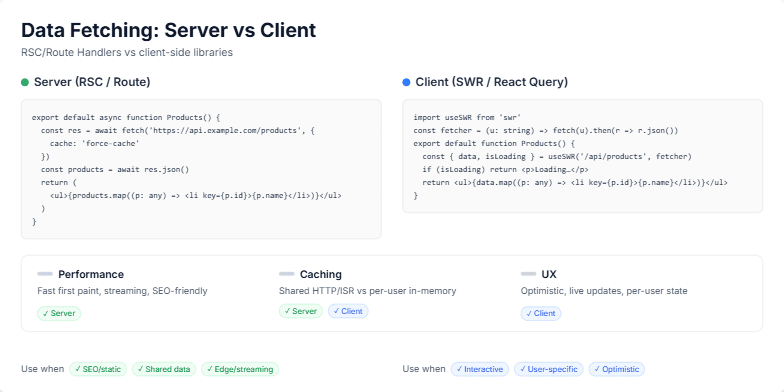
Create a slide comparing server-side data fetching (using React Server Components/Route Handlers) and client-side data fetching (using SWR/React Query). The slide should highlight the pros and cons of each approach, focusing on performance, caching, UX, and when to use each method. Include code examples for both server-side and client-side fetching. The design should be clean and modern with a clear visual separation between the two approaches. Use animations to emphasize key points and comparisons.
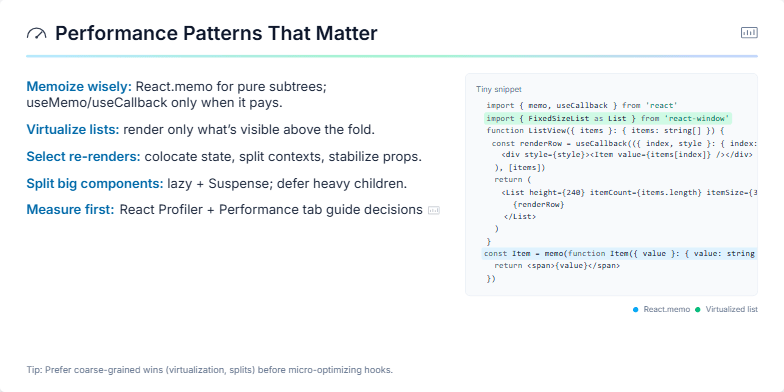
Create a slide about React performance optimization patterns, including memoization, virtualization, selective re-renders, splitting components, and measuring performance. Provide code examples for memoization and virtualization using React.memo, useCallback, and react-window. Include a tip to prioritize coarse-grained optimizations over micro-optimizations. The target audience is React developers. The slide should have a title, short descriptions of each pattern, a code snippet, and visual cues like icons and color highlights.
Want to generate your own slides with AI?
Start creating high-tech, AI-powered presentations with Slidebook.